
If you’ve spent any time topside in Arc Raiders, you’ve probably had the unfortunate experience of watching those four yellow lasers lock onto you before a barrage of missiles turns your raid into a very short trip. Rocketeers are one of the most dangerous enemies you’ll face. These heavily-armored flying artillery machines dominate open spaces and can down you in just two hits. In this guide, we’ll break down what makes Rocketeers so deadly and reveal the most effective ways to take them down.
Highlights & Takeaways
- Rocketeers are your biggest aerial threat: These flying artillery units pack a serious punch with devastating missile barrages and can take you down in just two hits.
- Target their thrusters and core: Exploit their main weak points – the rotors/thrusters to ground them, and the glowing red core for critical damage.
- Gear up for a tough fight: Bring the right firepower. Heavy weapons like the Hullcracker or sustained damage from the Anvil are key, and grenades like Showstoppers are game-changers.
- Never fight in the open: Always use solid cover and master the stun-and-burst or peek-and-shoot tactics to survive and win.
What is A Rocketeer?
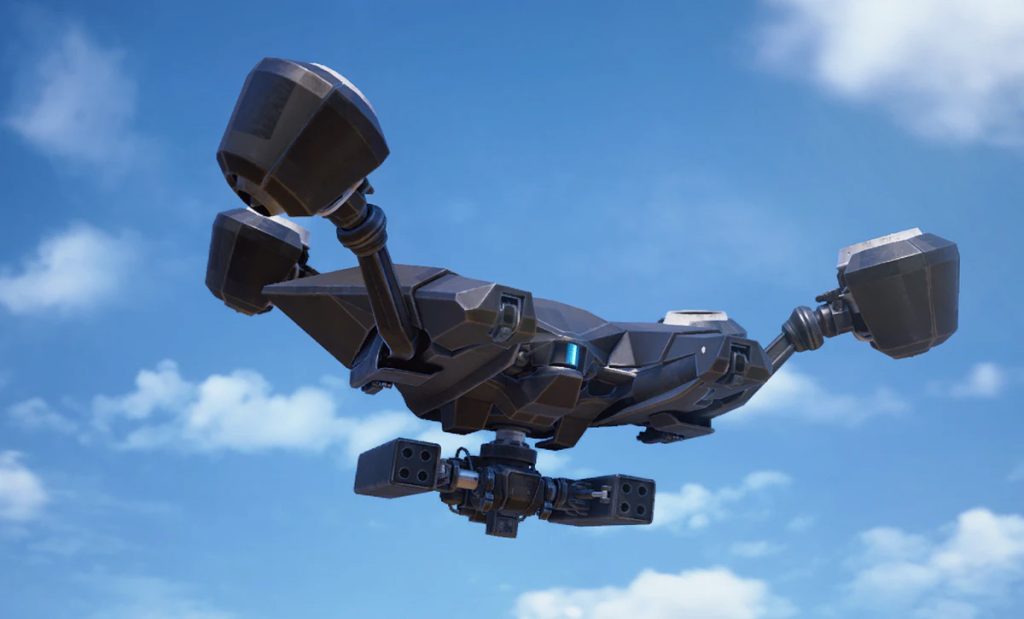
Rocketeers are large, flying ARC units that station themselves around high-value areas like extraction elevators and key locations on every map. Their attack pattern is consistent but brutal. A Rocketeer will aim four yellow targeting lasers at you, and once they line up and turn red, you’ve got about a second before it fires one to four guided missiles. Each missile deals massive damage with a substantial splash radius, meaning even if you dodge the direct hit, you’re likely taking damage from the explosion. Two clean hits will down you, and that’s if you’re lucky enough to survive the first one.
Unlike their smaller flying cousins like Wasps and Hornets, Rocketeers have significantly more armor and health. While they share the same basic weakness—their thrusters—it takes considerably more firepower to bring a Rocketeer down.
Where to Find Rocketeers
You’ll encounter Rocketeers on most maps. We recommend using Metaforge to find possible spawn locations, though they’re hard to miss. Some of the most reliable spawn points include:
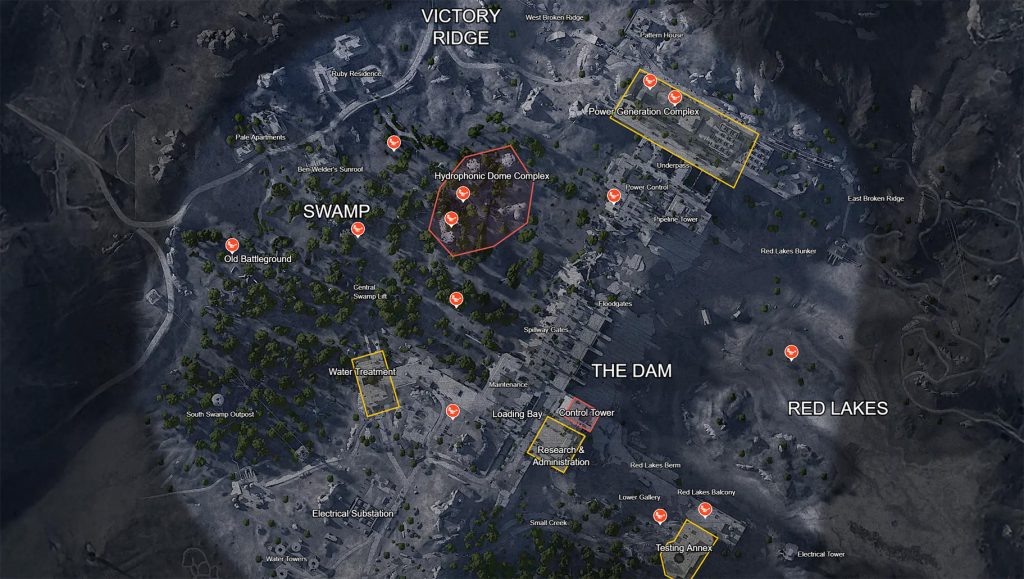
Dam Battlegrounds: This is probably your best bet for hunting Rocketeers. There’s usually one stationed southeast of the Testing Annex near the Red Lake Elevator. The northwestern part of the map also tends to have a spawn. One is typically found near the North Complex Elevator, and another just south of the Hydroponic Dome Complex.
Spaceport: You’ll find Rocketeers patrolling around key areas here as well, particularly near extraction points.
Weak Points and How to Exploit Them
Every ARC unit has weak spots, and Rocketeers are no exception. The key to taking one down efficiently is knowing where to aim.
Thrusters/Rotors: These are the Rocketeer’s primary weak points. They’re the large propulsion systems that keep it airborne, and while they’re not hard to hit, they do require some serious firepower to destroy. Focus your attention on these, and destroying two thrusters will cause the Rocketeer to crash to the ground. Once it’s grounded, it becomes significantly easier to finish off.
⚔️ Recommended Loadout for Rocketeer Fights
| Weapon/Tool | Type | Cost | Why It Works |
|---|---|---|---|
| 💥 Hullcracker | HEAVY | 30,000₵ | Punches through ARC armor. ~12 shots to kill. |
| 🔫 Anvil | HAND CANNON | Craft/Find | High per-shot damage. Solid thruster penetration. |
| 🎯 Ferro | BATTLE RIFLE | Craft/Find | Best budget option. Single-shot heavy ammo. |
| 🎯 Bettina | ASSAULT RIFLE | Craft/Find | Full-auto heavy ammo. Sustained pressure. |
| 🔭 Osprey | SNIPER RIFLE | Craft/Find | Long-range precision. Keeps you safe from missiles. |
| 🧨 Essential Grenades & Tools | |||
| 💣 Wolfpack Grenade | EXPLOSIVE | Rare/Craft | 12 homing mini-rockets. Can one-shot a Rocketeer. |
| ⚡ Showstopper | STUN | Common | Stuns and grounds Rocketeers for several seconds. |
| 💨 Smoke Grenade | UTILITY | Common | Blocks vision for ~20 seconds. Perfect for resetting. |
| 🎣 Lure Grenade | UTILITY | Common | Redirects targeting. Buys time to reposition or heal. |
| 💊 Healing Supplies | SURVIVAL | Essential | Stock up on bandages and shield rechargers. |
💰 BUDGET LOADOUT: Ferro + Showstopper + Smoke Grenade (~5,000 credits)
👑 OPTIMAL LOADOUT: Hullcracker + Wolfpack + Showstopper (solo-capable)
The Best Weapons and Tools
Not all weapons are created equal when it comes to ARC units. Rocketeers have heavy armor, which means you need to bring the right gear if you want to take one down without burning through all your resources.
Heavy Weapons:
- Hullcracker: This is the gold standard for taking down Rocketeers. At $30,000, it’s a significant investment, but it punches through ARC armor like nothing else. Players report that around 12 shots should be more than enough to bring one down, and you’ll likely have ammo left over. If you’re flush with cash and want reliability, this is your weapon.
- Anvil: A solid alternative that deals high per-shot damage and has good armor penetration. Great for sustained pressure on weak points and more cost-effective than the Hullcracker.
- Ferro, Bettina: Other heavy rifles that work well for consistent damage output.
Explosives:
- Wolfpack Grenade: This is probably the single most effective tool for Rocketeer elimination. One well-placed Wolfpack grenade can destroy a Rocketeer if you’re lucky. Two grenades will guarantee a kill. The downside? They’re rare and expensive, and finding the blueprint for crafting them is even harder. Save these for when you absolutely need them.
- Showstopper: This is the secret weapon for Rocketeer fights. Showstoppers detonate after a short delay and stun ARC enemies for several seconds. When a Rocketeer gets hit, it falls to the ground and becomes completely vulnerable. This gives you and your squad a perfect window to unload on it without worrying about return fire. If you can chain multiple Showstoppers, you can keep it grounded for the entire fight, giving you a massive advantage.
- Adhesive Explosives (Snap Blast Grenade/Trigger ‘Nade): These can stick directly to the Rocketeer and deal solid burst damage on detonation. Most effective when it’s already grounded or stunned, they provide solid burst damage on detonation.
Utility Items:
- Lure Grenade: Can redirect the Rocketeer’s targeting, giving you time to reposition or get clean shots off.
- Smoke Grenades: These block the Rocketeer’s line of sight for around twenty seconds. Perfect for resetting the fight, healing up, or repositioning without taking missile fire.
- EMP Grenades: While not as effective as Showstoppers, these can stun the Rocketeer temporarily and give you a brief window to deal damage.
Combat Strategy: How to Fight a Rocketeer
Taking down a Rocketeer isn’t just about having the right weapons—it’s about tactics and timing.
Step 1: Find Good Cover Never engage a Rocketeer in the open. You need solid cover like thick walls, building interiors, or large structures. The splash damage from its missiles is substantial, so even partial cover won’t save you. Buildings with roofs are ideal since they completely negate the arcing trajectory of the missiles.
Step 2: Watch the Laser Pattern The Rocketeer always telegraphs its attacks. When you see those four yellow lasers sweeping around, that’s your warning. Once they even try locking onto you, you have only a second or two to either break line of sight or get behind solid cover. Never stay fight a rocketeer in the open if you can help it.
Step 3: The Stun-and-Burst Method This is the most reliable strategy, especially if you’re solo or playing with a small squad. The basic loop is:
- Throw a Showstopper at the Rocketeer
- Wait for it to crash to the ground
- Unload heavy weapons fire on the thrusters and red core
- Throw another Showstopper when it starts to recover
- Repeat until it’s destroyed
This method minimizes risk and ensures you’re not trading health for damage. If you run out of Showstoppers (grenades), fall back to the next strategy.
Step 3 Option 2: The Peek-and-Shoot Approach (For Solo Without Stuns) If you don’t have Showstoppers or Wolfpack grenades, you’ll need to play more conservatively:
- Position yourself near solid cover with multiple angles to peek from
- Wait for the Rocketeer to fire its missile volley
- During the brief reload window, peek out and fire at the thrusters
- Duck back into cover before the next volley
- Circle around structures to maintain different firing angles
- Focus on destroying two thrusters to force it to crash
The key is patience. Don’t get greedy with your damage windows—surviving is more important than getting that extra shot off.
Step 5: Manage Your Position Always know where your escape route is. If you’re getting low on health or the fight isn’t going your way, retreat. There’s no shame in living to fight another day, especially when you can come back with better gear.
Alternative Strategies
Riding the Rocketeer: Here’s a wild one—you can actually climb on top of a Rocketeer using a Snap Hook or by stunning it first with a Showstopper. Once you’re on top, you can damage it with any weapon, including melee. This is incredibly risky but can work in a pinch. As a bonus, if you deal 50 damage to any enemy while riding a Rocketeer, you’ll earn the “Death From Above” achievement.
What You’ll Get for Your Trouble
After you’ve destroyed a Rocketeer, make sure to search the wreckage thoroughly. You’ll typically find:
🚀 Rocketeer Loot Table
| Item Name | Rarity | Quantity | Value | Primary Use |
|---|---|---|---|---|
| ⚙️ Rocketeer Driver | EPIC | 1 | 3,000 | Explosives Station Lv3, Advanced crafting |
| 🔋 ARC Powercell | RARE | 2-4 | 450 ea | Workshop upgrades, Energy weapons |
| ⚡ ARC Motion Core | RARE | 1-2 | 650 ea | Mobility gear, Mechanical parts |
| 🔌 ARC Circuitry | UNCOMMON | 3-5 | 275 ea | Electronics, Tech stations |
| 🛠️ ARC Alloy | COMMON | 5-8 | 125 ea | Basic crafting, Repairs |
| 🔧 Heavy Gun Parts | RARE | 1 | 800 | Hullcracker parts, Heavy weapons |
| 🚀 Rocket Ammo | UNCOMMON | 2-3 | 200 ea | Hullcracker ammo, Crafting |
💰 AVERAGE VALUE PER KILL: 8,500-12,000 credits (depending on Rocketeer Driver drop)
🔍 SEARCHABLE PIECES: Rocketeers break into 3-4 separate wreckage pieces. Search them ALL before other players show up or loot despawns.
🎯 THE BIG PRIZE: The Rocketeer Driver is essential for upgrading your Explosives Station to Level 3, which unlocks Wolfpack grenade crafting. You need THREE drivers total.
The Easy Way: Husk Graveyard Events
If you need Rocketeer Drivers but don’t want to risk fighting the real thing, wait for the Husk Graveyard event. During this event, destroyed ARC units appear around the map as husks that you can breach for components. You can find Rocketeer Husks in the Dam Battlegrounds (particularly around the Old Battleground in the Swamp area) and Spaceport (on the south side of the map). This method is much safer and lets you collect drivers without the combat risk.
Final Tips
- Crouch when not engaged: Rocketeers have sensors but aren’t omniscient. Crouching reduces your detection range significantly.
- Heavy ammo is mandatory: Regular bullets barely scratch Rocketeer armor. Don’t even bother without heavy ammo weapons.
- Prioritize Rocketeers in group fights: If you’re facing multiple ARC units, always take down the Rocketeer first. Its damage output is too high to ignore.
- Team coordination multiplies effectiveness: If you’re in a squad, have one person draw aggro while others focus fire on the thrusters. Coordinated burst damage is the fastest way to end the fight.
Rocketeers might seem impossible when you first encounter them, but with the right strategy and equipment, they become manageable. Just remember: respect the missile barrage, target the thrusters, and never fight in the open. Good luck out there, Raider!